How to Work with Molding.
There are three different ways you can include molding in your CutList Plus fx projects. This article describes each, so you can choose the approach that's best for you.
So that we have a specific example to discuss, let's assume you need to apply 3 inch crown molding to three edges at the top of a cabinet that is 30 inches wide and 18 inches deep.
Technique 1: Molding as an "Other Item"
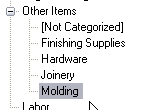
The easiest way to specify molding is to treat it as an Other Item. On the Raw Materials screen, set up an Other Item Category just for molding:
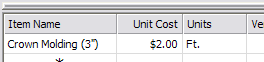
Then, you can set up a specific entry for 3" crown molding, and enter its cost. Here, I've specified that it costs $2 per foot.
Finally, for our example, we figure that we need 6 feet of molding to wrap around our cabinet. (This allows some extra material for the miters.) On the Other Items screen, create an entry for this:

The molding will now show up on the BOM:

Technique 2: Molding as Banding
The main drawback to the first approach is that you have to calculate the total length yourself. An alternative that gets CutList Plus to do this for you is by creating a type of edge-banding as a stand-in for your molding.
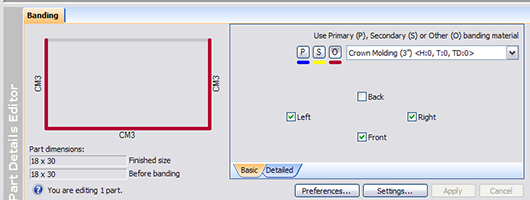
On the Raw Materials screen, create a new banding item for the crown molding. This is similar to what we did using the Other Items approach. We'll assign a banding code to the molding (I used CM3 to stand for 3 inch crown molding). And, we can specify an Overhang which will take into account the extra length needed for the mitered corners.

On the milled parts list, create an entry to represent the top of the cabinet:

In the Banding editor, specify the three edges that need crown molding:
The molding now shows up on the banding BOM:

Technique 3: Molding as Dimensioned Lumber
The banding technique works great unless you want to get cutting diagrams for the banding. This could be because you plan to mill the molding yourself from lumber. Or, maybe you want to optimize your purchases of pre-milled molding in stock lengths. For both of these cases, you can treat molding as dimensioned lumber.
If you will be milling the molding yourself, you can treat molding as just another part. You'll need to specify the various lengths needed, and choose the appropriate dimensioned lumber.
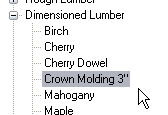
However, if you are using pre-milled molding, you need to set this up on the Raw Materials screen. Create a new Dimensioned Lumber to represent the molding:
The trick to this approach is to realize that the thickness and width don't matter; we only care about the length.

We just need to be consistent on the Raw Materials screen and the Parts screen. I like to say that the thickness is 3/4 and the width is 4 inches. As with the examples above, we can specify a cost per foot.
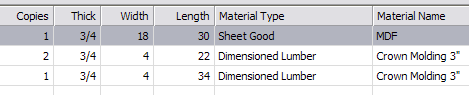
To use this molding, create new parts. To allow for the miter cuts, I'll add 4 inches to the dimensions of each edge. Here are the molding parts after they are added to the project:
The neat thing about this technique is that you can get cutting diagrams for the molding. Here are the three pieces needed for our example:
